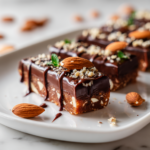
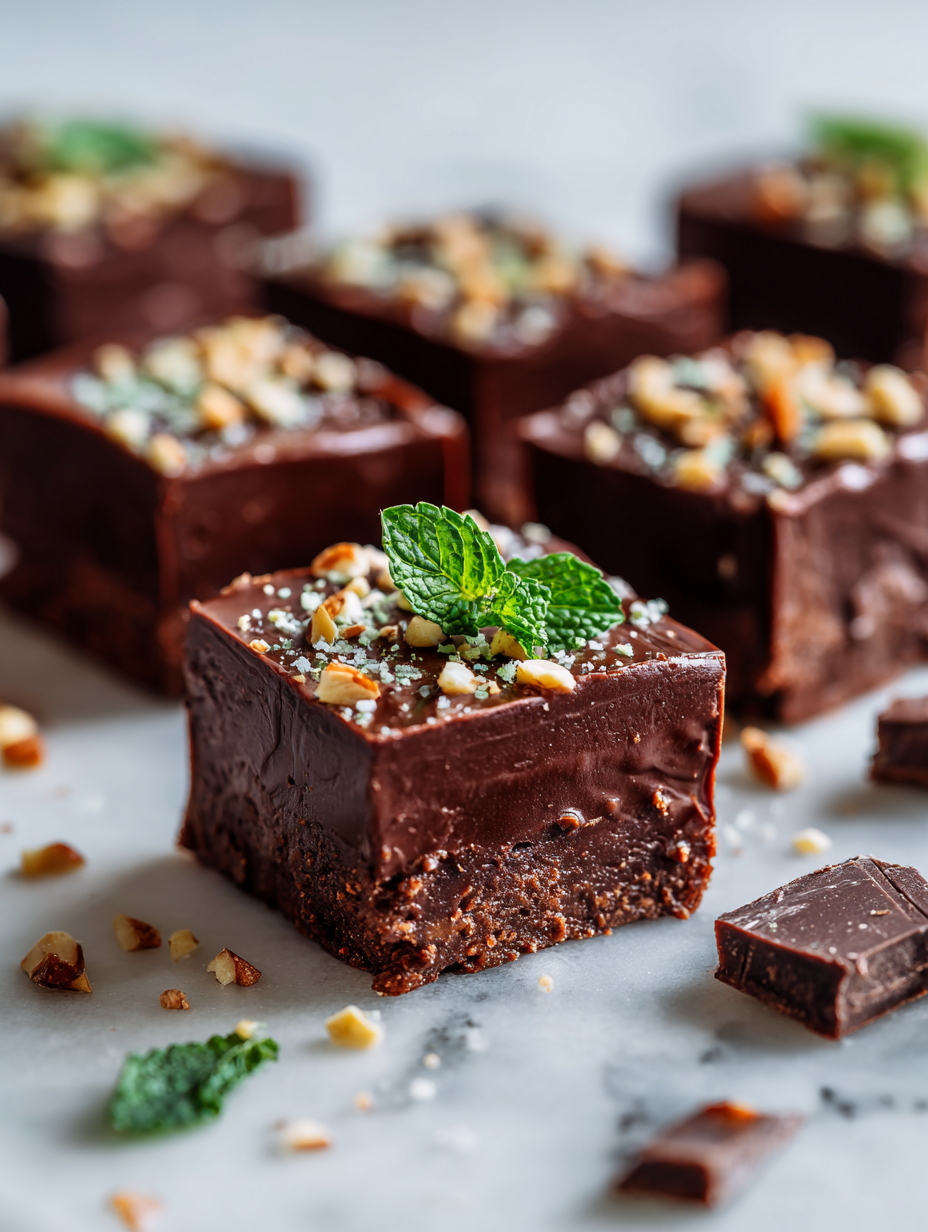
When I first stumbled upon the idea of no-bake peanut butter bars, it was late one evening, and I was craving something sweet and satisfying but didn’t want to turn on the oven. The beauty lies in how simple ingredients—peanut butter, chocolate, and a bit of butter—can come together into something rich and gooey without any heat.
There’s a certain comfort in this no-fuss approach. It’s a recipe that feels like a hug, perfect for busy days, last-minute guests, or when the chocolate craving hits hard. Plus, you get to skip the cleanup, which is a win in my book.
A cook’s notes on making the most of pantry staples for a quick, nostalgic treat.
Why I Keep Coming Back to This Recipe
- I love how versatile these bars are—they’re perfect for a quick snack or a party treat.
- Sometimes I add a dash of vanilla or a sprinkle of sea salt on top for extra flavor.
- I get nostalgic just thinking about how my grandma used to make similar no-bake treats after school.
- They’re honestly foolproof—no oven, no fuss, just good old-fashioned comfort.
- Making these always makes my kitchen smell like peanut butter and chocolate, which is a good thing.
The story behind these bars
- This recipe was born out of a busy weekend when I needed something quick to satisfy a sweet craving without turning on the oven.
- A handful of pantry staples and a little patience to chill, and I had a batch ready in no time.
- Over the years, I’ve tweaked the ingredients, swapping graham crackers for digestive biscuits and adding a pinch of sea salt for balance.
Fun facts about peanut butter bars
- This classic treat originated in the United States, gaining popularity in the mid-20th century.
- Many recipes call for corn syrup or honey, but I prefer the simple route with butter and sugar.
- The combination of peanut butter and chocolate echoes the famous peanut butter cups but in bar form.
- In some regions, similar recipes are made with different nuts or cereals, reflecting local tastes.
- The no-bake method was a necessity during times of resource scarcity, but now it’s a shortcut you can’t live without.
Ingredient insights and tweaks
- Peanut butter: I prefer natural, runny varieties for easier mixing. The aroma of roasted peanuts is irresistible.
- Chocolate chips: Use good-quality semi-sweet or dark chocolate. The shiny finish and rich flavor are worth it.
- Butter: Unsalted is best for control over saltiness. It melts smoothly and helps everything bind.
- Graham cracker crumbs: Crushed finely for a smooth, cohesive base. Adds a slight sweetness and crunch.
- Powdered sugar: I sift it first to avoid lumps. It dissolves quickly into the peanut butter mixture.
Key ingredients’ quirks and charms
Peanut Butter:
- Its oily, salty richness melts into the chocolate, creating a luscious, gooey texture.
- It’s the flavor backbone, so choose a jar that smells fresh and roasted.
Chocolate Chips:
- They melt into a shiny, crackly top, offering a bittersweet contrast to the peanut butter.
- Look for chips that shimmer and don’t immediately sink or seize when melted.
Substitution notes for different diets
- Dairy-Free: Swap regular butter for coconut oil or vegan margarine, slightly changing the richness.
- Sugar-Free: Use a natural sweetener like honey or maple syrup, but adjust the quantity for sweetness.
- Gluten-Free: Ensure your graham crackers are certified gluten-free, or substitute with rice cereal.
- Nut-Free: Use sunflower seed butter instead of peanut butter for allergy-friendly bars.
- Dark Chocolate: Replace semi-sweet chips with 70% or higher dark chocolate for a richer, less sweet finish.
Equipment & Tools
- 20cm (8-inch) square pan: To shape and chill the bars
- Microwave-safe bowl: For melting ingredients
- Spatula or rubber scraper: To press and spread layers
- Sharp knife: To cut bars neatly
- Parchment paper: To prevent sticking and for easy removal
Step-by-step guide to no-bake peanut butter bars
- Line a 20cm (8-inch) square pan with parchment paper, leaving a slight overhang.
- In a microwave-safe bowl, melt 1 cup (250g) of peanut butter, 1/2 cup (115g) of unsalted butter, and 1 cup (120g) of powdered sugar. Stir until smooth, about 1-2 minutes in 30-second bursts.
- Add 2 cups (200g) of graham cracker crumbs or crushed digestives. Mix until well combined and the mixture feels thick and slightly sticky.
- Press this mixture evenly into the prepared pan using a spatula or your fingers. Chill in the fridge for 30 minutes.
- Melt 1 cup (180g) of chocolate chips with 1 tablespoon (15ml) of coconut oil or butter until shiny and smooth, about 30 seconds in the microwave. Stir well.
- Pour the melted chocolate over the peanut butter layer, spreading it evenly. Return to the fridge for at least 2 hours or until set.
- Once firm, lift the bars out of the pan using the parchment overhang. Slice into squares with a warm, sharp knife.
- For a clean cut, wipe the knife with a hot damp cloth between slices.
- Serve chilled or at room temperature, depending on your texture preference.
- Store leftovers in an airtight container in the fridge for up to a week.
Chill bars until fully set, about 2 hours. Slice with a warm knife, serve straight from the fridge.
How to Know It’s Done
- Chocolate layer is shiny and firm when touched.
- Bars are firm enough to cut without crumbling.
- Edges look clean and not cracked.
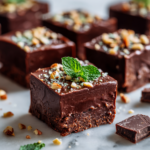
No-Bake Peanut Butter Bars
Ingredients
Equipment
Method
- Line your square pan with parchment paper, leaving overhang on sides for easy removal.
- In a microwave-safe bowl, melt the peanut butter, melted butter, and sifted powdered sugar together in 30-second bursts, stirring until you get a smooth, creamy mixture that’s slightly thick but spreads easily.
- Add the finely crushed graham cracker crumbs to the peanut butter mixture and stir until well combined. The mixture should feel thick and slightly sticky, with a peanut butter aroma filling the air.
- Press this mixture evenly into the prepared pan using a spatula or your fingers, creating a firm, even base. Place the pan in the fridge to chill for about 30 minutes.
- Meanwhile, melt the chocolate chips with a tablespoon of coconut oil or butter in the microwave in 30-second bursts, stirring well after each until the mixture is shiny and smooth.
- Pour the melted chocolate over the chilled peanut butter layer, spreading it out with the spatula to create an even, glossy top. Return the pan to the fridge and chill for at least 2 hours, or until the chocolate is set and firm.
- Once the bars are fully set, lift them out of the pan using the parchment overhang. Use a sharp knife warmed slightly to cut into squares, wiping the blade clean between slices for neat edges.
- Serve the bars chilled or at room temperature, enjoying their rich, gooey texture and shiny chocolate top. Store any leftovers in an airtight container in the fridge for up to a week.
Tips and tricks for perfect bars
- Melt in short bursts → Keeps chocolate smooth and prevents burning.
- Use room temperature ingredients → Mixes more evenly and spreads easily.
- Press mixture firmly → Avoid air pockets and ensure bars hold together.
- Chill layers separately → For crisp, clean layers.
- Wipe knife between cuts → For neat, even slices.
Common mistakes and how to fix them
- FORGOT TO LINE THE PAN? Use parchment paper for easy lifting and clean cuts.
- DUMPED TOO MUCH CHOCOLATE? Spread evenly and chill longer, or add more peanut butter to balance.
- OVER-TORCHED CHOCOLATE? Reheat gently, stirring until smooth.
- CANDY TEXTURE? Ensure the chocolate is melted completely and cooled slightly before pouring.
Quick fixes for common issues
- When chocolate cracks, warm it slightly to smooth out imperfections.
- Splash a little hot water on your knife for cleaner cuts.
- Patch cracks by gently pressing melted chocolate into the gaps.
- Shield the bars from moisture by wrapping tightly if storing overnight.
- If the mixture feels too dry, add a teaspoon of milk or cream.
Make-ahead tips and storage
- Prepare the base and chill in advance; it’s good for up to 24 hours before adding chocolate.
- The bars keep well in the fridge for up to a week, maintaining their texture and flavor.
- For longer storage, freeze for up to 3 months, wrapped tightly in foil or in a container.
- Let thaw in the fridge for 30 minutes before serving for best texture.
10 Practical Q&As About No-Bake Peanut Butter Bars
1. Can I use crunchy peanut butter?
Use creamy peanut butter for a smooth, melt-in-your-mouth texture. Crunchy adds a nutty bite, but can be harder to spread.
2. Can I substitute other nut butters?
Yes, but it changes the texture. For a more uniform bar, stick with creamy.
3. Can I make these with dark chocolate?
Chocolate chips melt quickly, so stir them into warm cream before pouring. Use good quality for rich flavor.
4. Do I need to refrigerate after making?
Line your pan with parchment for easy removal. Greasing can make the bars stick.
5. How long do these last?
Chill the bars for at least 2 hours to set properly. They become firm and slice easily.
6. Can I freeze these?
Store in an airtight container in the fridge for up to a week or freeze for longer.
7. How do I get a smooth top?
Use a spatula to press the mixture evenly into the pan. It helps avoid air bubbles.
8. Why do my edges crack?
Warm the knife before slicing for clean cuts. Wipe it clean between cuts.
9. Can I add toppings?
Add a sprinkle of sea salt on top for a balancing flavor contrast.
10. Are these suitable for vegans?
Yes, sprinkle with sea salt or crushed peanuts before chilling for extra texture.
These bars are a quick fix that keep well in the fridge and taste even better after a day or two. The peanut butter mellows into a salty-sweet bite, complemented by the shiny, crackly chocolate top.
Sometimes, I toss in a handful of crushed pretzels or a sprinkle of flaky sea salt for extra dimension. It’s a flexible recipe that’s as forgiving as it is delicious. Just keep them chilled, and they’ll be ready whenever that sweet tooth strikes.

Hi, I’m Charlotte Hayes, the creator and storyteller behind Lost in the Aroma. If you’ve ever closed your eyes while something simmered on the stove just to take in the scent, then you already understand what this space is about. For me, aroma is memory. It is emotion. It is the first sign that something beautiful is about to be shared. Lost in the Aroma is where I bring together recipes, sensory storytelling, and my lifelong love for food. I am so glad you’re here.

Leave a Reply